|
|
Help Topics
|
Overview
The DesignScape Visualizer is a tool that allows the user to see how different patterns and configurations of pavers would look in the vicinity of a house, garage, swimming pool, or in a variety of other landscaping situations. A photo can be loaded into the program which can be used to create an image using Cambridge pavers, walls and outdoor living kits. The image can be Saved, Printed or Emailed. The program also features a "View Esitmate" which is a calculator used to estimate the amount of material necessary to complete a project. Select from the Help Topics on the left to find information and instructions on accomplishing various tasks using the DesignScape Visualizer.
Tutorial & Overview Video
Starting a New Project
After logging-in you will be presented with the option to start a NEW project using your own photo or to use a sample photo that we provided for you to demo. 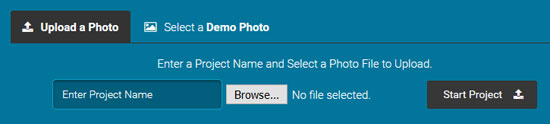 Using Your Own Photo Type in a unique name for your design in the "Project Name" field. This will allow you to identify this project from other projects that you have created. Next, click the "Browse" option to select the photo from your computer files location. Once selected, click the "Start Project" button. It will then advance to the "Crop" photo feature. Using The Sample Photo Simply click on the small sample photo image and the program will load the image into the designer. This option will bypass the crop feature.
Cropping Your Photo
The crop feature allows you to "Select Your Design Area". An adjustable box will appear over your uploaded photo. The program will allow you to move the adjustable box to define the area you want to keep by moving the controllable nodes that are available around the box. There is a minimum image size requirement, so it will not allow you to reduce the box beyond a certain point. See example below. 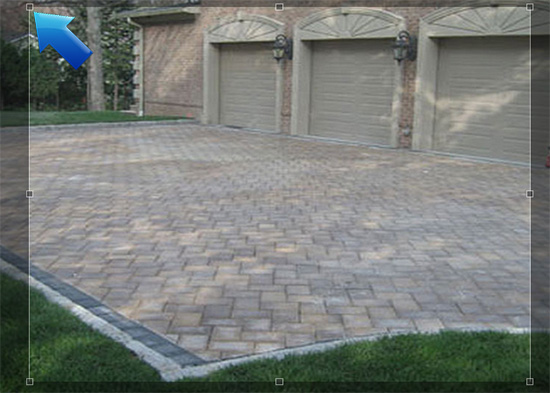 Once you have made the desired adjustments to define your project area, simply click the "Continue" button to advance. The program will load your photo into designer mode.
Using Designer Options
In designer mode your photo will be displayed on the gridded canvas area. On the bottom left corner of your screen you will see three primary control options (Pavingstones, Wallstones and Outdoor Living). You generally want to start your design project from the "Ground Up", so if you choose to include one or more of the product types, it is best if you add Pavingstones first, Wallstones second and Outdoor Living options last. See the primary control options shown below.  How To Add Pavingstones Make sure you've clicked on "Pavingstones" and that it is the active section. You must first apply and layout a field to your photo. This is achieved by clicking the "Add Area To Cover" button. Upon clicking that button, a starting field area will appear on your photo. You can then layout and establish the position of the field as desired by controlling the "Blue" node points. In the layout mode an "active" object is indicated by a "Green Glow" highlight. See example below.  You can move, add or delete the blue node points to create and position the contour area as the layout for where pavingstones will go.
Once you define your area, choose one of the other three tabs to switch to "Visual Mode" and you can make selections. The tabs are "Patterns", "Colors" and "Settings". Patterns This section allows you to view pavingstone pattern options from any of the "Collections" provided. Simply click on a pattern image from any of the collections and that pattern will be applied to your layout area. It will automatically switch to the "Color" tab for you to make a color selection after choosing a pattern. See example below.  Colors This section allows you to view pavingstone colors that are available for the Collection and Pattern that are selected. Simply click on a color swatch. The color name will display when you hover over it. It will change the color of the selected pattern in the scene above. See example below.  Settings This section allows you to make adjustments to the "active" pavingstones area. You can "Scale", "Rotate" or add a "Border" as you desire. See example below.  How To Add Circle Designs Make sure you've clicked on "Pavingstones" as the active primary area on the bottom left and that it is the active section. While in the "Layout" tab, you click the "Add Circle Design Kit" button as shown below.  Whenever you click on a circle design in your project it becomes the active selection. The "Patterns", "Colors" and "Settings" tabs will then present options and control the allow you to adjust the selected (active) circle design. Wallstones Working with Wallstones will work in the same process as with Pavingstones. Select "Wallstones" as the active primary area on the bottom left. Apply a wall to your project by clicking "Add a Wall" button as shown below. A red contour line will appear in the upper left of the design canvas. You can drag the line to where you would want the wall placed. The "Patterns" tab is where you will find the different types of wall systems. The "Colors" will be available to be selected for the wall types you choose. The "Settings" tab is where you can adjust the height of the wall.  Outdoor Living Make sure you've clicked on "Outdoor Living" as the active primary area on the bottom left and that it is the active section. Outdoor Living components are added by simply clicking on the image of the element and it will be added to your project. You can then click and drag the object to position it in your project. Select the "Settings" tab to adjust (size, rotation, etc.) as needed. 
Saving a Project
You can and should "Save" the work you accomplish while using the designer. The "Save" option is presented in "Visual Mode" and it is located on the right side of the screen. Simply, click the "Save" icon button to save your information. See example below.  A saved project becomes available in your "projects" area where you later edit them and perform other options as well. Remember, if you make any changes to a new or existing projects, be sure to save before leaving the visual mode or logging out.
Manage Projects
Under the "Projects" tab you have the option to perform several functions with any project you have created. Each project will display several function icons for your use. They will appear as shown below.  View Selecting the "View" option will present an image of your design project on the screen. You have an option to view your "Starting Photo" as well so you can compare the before and after. Edit Selecting "Edit" will load the selected project back in to the designer for modifications to be applied as needed. Be sure to "save" any changes you make while in the designer. Selecting "Print" will trigger you computer's print dialog option for printing out an image of your saved project on your local printer. Export Selecting "Export" will allow you to save a .JPG file of your project on your computer file system. This can be helpful if you need to back-up or share your design image file. Selecting "Email" will provide you with an option to compose an email to be sent to a recipent of your choice. You have the option to attached your "Design Project", "Starting Photo" or "Project Estimate" if you like. Simply complete the form and click "Submit". Delete The "Delete" option allows you to remove a project from your projects list. This will remove it completely from your account.
Using View Estimate
The "View Estimate" option allows users to get a general idea of how much product is required to accomplish a project that they have designed. This can be used as a general estimate that can be discussed with your contractor or distributor regarding your design project. This option will allow you to enter in data (i.e. Sqft., LF.) for calculating the estimated amount of product. You can then "Save" the data you input and also "Export as PDF". See example shown below. 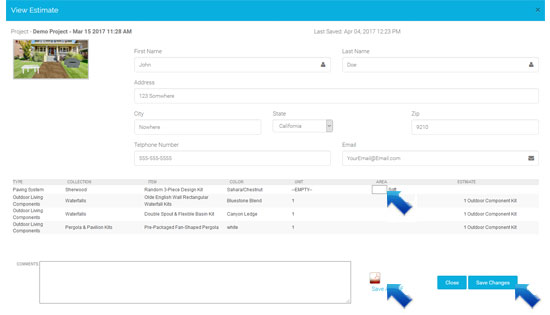
Frequently Asked Questions
Below are some general and common questions about using the Cambridge DesignScape Visualizer. You can also check the "How To" topics listed on the left for more instructions. Q. Can I email my design projects? A. Yes. Simply click the "Email" option for a project listed in your projects section. Enter a recipient email address and make your other optional selection and click "Submit". Q. Is there a limit to how many projects I can create? A. There is no limit to how many project you can save. Q. Can I crop my photos? A. Yes. When you start a new project and upload a photo, the system will give you an option to "Define A Design Area". Q. Can I add other elements to my design other in addition to Cambridge Pavingstones products? A. Yes. Under the "Pavingstones" section you can define and add areas of "Grass", "Cement" and "Asphalt". Q. Who can use the Cambridge Designscape Visualizer? A. The program is intended for homeowners, contractors and design professionals to easily self-design, layout and visualize a project space using Cambridge Pavingstone products and solutions. |
 Collapse All
 Expand All